Creating a Kubernetes Cluster at Home


I've had the itch recently for a really good homelab project. After looking at the other server I have, it's running almost 50 containers. It's main use is Plex. It runs everything from this blog you are reading, to our family recipe book. Why am I bogging it down while it's trying to transcode media? I asked myself this and decided to make a plan for these additional services.
I've always wanted to run my own Kubernetes cluster and a little challenge is nothing to be scared of. It's always looked like it would fun to make and maintain my own. I've already done it a bunch of times, installing and creating a new cluster is part of the CKA exam after all. I was initially looking at k3s, but decided to do the full k8s install instead. More fun that way with a bit more control. Also, it's fun to learn as much as possible during the process.
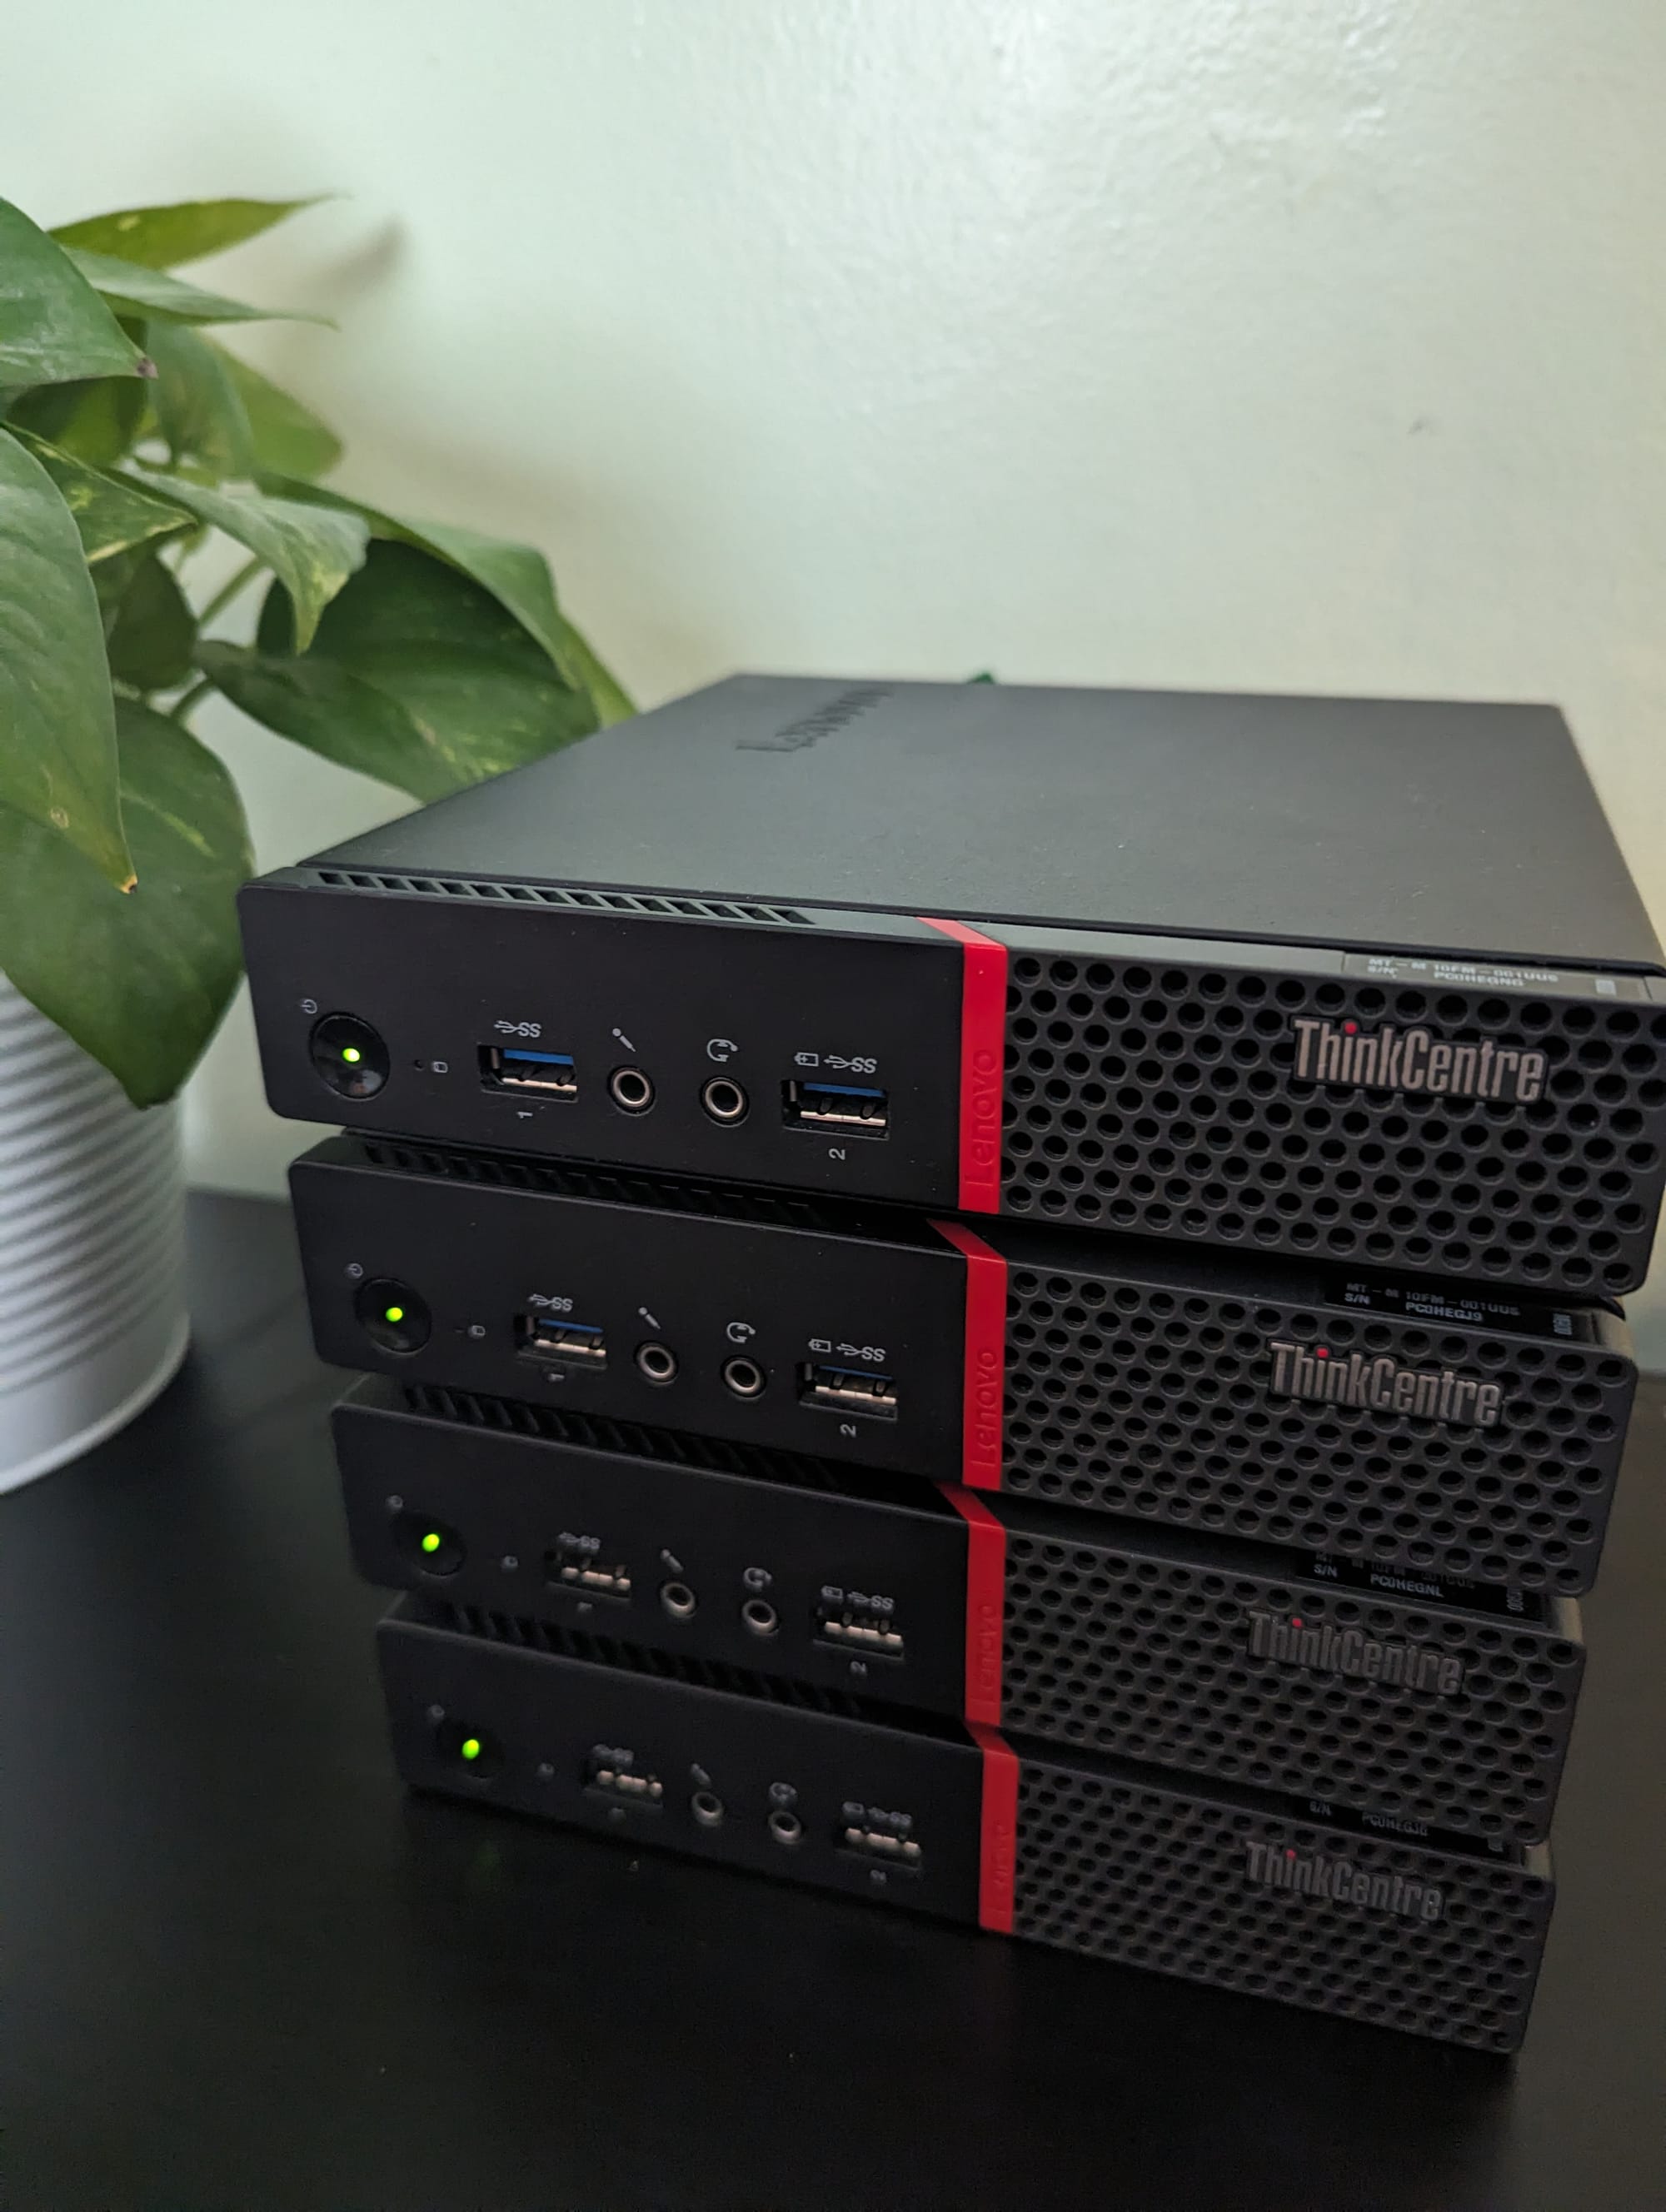
I purchased four Lenovo ThinkCentre M900 workstations, so I will have a master and three worker nodes. An affordable solution, each unit was under $75.
This will run through the process of how I created my Kubernetes cluster, starting from fresh Debian bookworm installs to having a working cluster. Let's begin.
Login as root and install sudo:
su -
apt update
apt install sudo
and then add yourself to sudo:
adduser myusername sudoInstall ufw - the firewall we are going to use for this.
sudo apt install ufwNext, add your default policies.
sudo ufw default deny incoming
sudo ufw default allow outgoing
sudo ufw allow ssh
Enable ufw.
sudo ufw enableLet's set a static ip.
sudo apt install vim net-toolsView route and gateway
netstat -nr It will have an output like this:
ronnic@debian-lenovo1:~$ netstat -nr
Kernel IP routing table
Destination     Gateway         Genmask         Flags   MSS Window  irtt Iface
0.0.0.0         192.168.1.1     0.0.0.0         UG        0 0          0 eno1
192.168.1.0     0.0.0.0         255.255.255.0   U         0 0          0 eno1
Let's edit our interfaces file, first back it up.
cp /etc/network/interfaces /etc/network/interfaces.bakIf you need to ever restore it, reverse the command.
cp /etc/network/interfaces.bak /etc/network/interfacesMake the following edits, using your own info:
iface eth0 inet static
       address 192.168.1.10 #this is the static IP address I want to set
       netmask 255.255.255.0 #use the info from the last line above
       network 192.168.1.0  #use the info from the last line above
       gateway 192.168.1.1 #your router's address/gateway
Reboot and ssh back in using the new IP.
Services with known vulnerabilities are a huge attack vector. You can get automatic security updates with unattended-upgrades.
Install the package:
sudo apt install unattended-upgradesEnable automatic upgrades:
sudo dpkg-reconfigure unattended-upgradesThe build-essential meta package includes all the relevant tools and necessary packages to enable developers to build and compile software from the source.
sudo apt install build-essential -yInstall Docker and follow the post-install instructions for linux as well. This allows the running of docker commands without sudo as well as running at startup.
Now, let's set up kubectl, which is the command line tool for kubernetes. Well also install kubelet, the node agent. Last, kubeadm for cluster admin. This is done on what will be our master node.
Install packages needed to use the Kubernetes repository:
sudo apt update
sudo apt install -y apt-transport-https ca-certificates curl
Download the public signing key. The same signing key is used for all repositories so you can disregard the version in the URL:
sudo mkdir -p -m 755 /etc/apt/keyrings

curl -fsSL https://pkgs.k8s.io/core:/stable:/v1.29/deb/Release.key | sudo gpg --dearmor -o /etc/apt/keyrings/kubernetes-apt-keyring.gpg
Add the repository:
echo 'deb [signed-by=/etc/apt/keyrings/kubernetes-apt-keyring.gpg] https://pkgs.k8s.io/core:/stable:/v1.29/deb/ /' | sudo tee /etc/apt/sources.list.d/kubernetes.listThis overwrites any existing configuration in /etc/apt/sources.list.d/kubernetes.list
Install the tools:
sudo apt update
sudo apt install -y kubelet kubeadm kubectl
Prevent automatic updates to these applications:
sudo apt-mark hold kubelet kubeadm kubectl
Verify Installation
To verify your installation, you can check the version of each tool:
kubeadm versionkubectl version --clientsudo systemctl status kubeletYou should see that the service is active even if you haven’t yet used it to set up a cluster.

Kubernetes requires swap to be turned off. Either install Debian without a swap partition, if one exists, comment out any swap lines in /etc/fstab
Also, run
sudo swapoff -aLoad Required Kernel Modules next, ensure that the br_netfilter module is loaded. This module is necessary for Kubernetes networking to function correctly.
sudo modprobe br_netfilterTo ensure these settings persist across reboots, add the following lines to /etc/sysctl.conf or a Kubernetes-specific configuration file under /etc/sysctl.d/:
net.bridge.bridge-nf-call-ip6tables = 1
net.bridge.bridge-nf-call-iptables = 1
Then apply the sysctl settings with:
sudo sysctl --system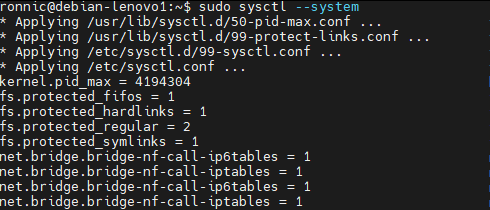
Next, Adjust Firewall Settings. Since we set up ufw, we need to allow traffic on the ports used by Kubernetes.
To elaborate on the network setting, here is a bit of an explanation of the ports we need open for master and worker.
For Master Nodes:
- 6443: This is the Kubernetes API server port, the primary control plane component for the cluster. It must be accessible from all nodes in the cluster, so if your worker node needs to communicate with the master, this port must be open.
- 2379-2380: These ports are for etcd server communications, used by Kubernetes to store all cluster data. They need to be accessible by all master nodes.
- 10250: The Kubelet API, which must be accessible from the Kubernetes control plane.
- 10251: The kube-scheduler port, accessible by the control plane.
- 10252: The kube-controller-manager port, also for the control plane.
- 179: Calico
For Worker Nodes:
- 10250: The Kubelet API, which should be accessible from the master node.
- 30000-32767: These are NodePort ports, which might be used if you expose services using NodePort type. They need to be accessible from outside the cluster.
For ufw, commands to open these ports would look like:
sudo ufw allow 2379:2380/tcp
sudo ufw allow 6443,10250,10251,10252,179/tcp
Finally, we get to initializing the master node. Initialize the Cluster by running kubeadm init to initialize the cluster. Specify the pod network CIDR if you plan to use a networking solution that requires it (such as Calico):
sudo kubeadm init --pod-network-cidr=192.168.0.0/16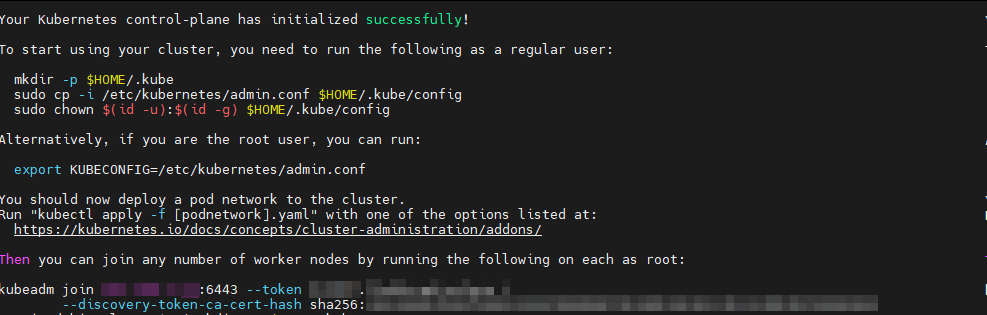
I was running into an error when running the init command:

If you find you are also getting this error, all you need to do is remove the containerd config, then restart it.
Remove the installed default config file: rm /etc/containerd/config.toml
containerd config default > /etc/containerd/config.tomlsudo systemctl restart containerdNow, we deploy a pod network: Choose a pod network add-on compatible with kubeadm and deploy it. For example, to deploy Calico. Download the deployment.yaml from here:
https://docs.projectcalico.org/manifests/calico.yamlApply after you uncomment the following lines in it:
            - name: CALICO_IPV4POOL_CIDR
              value: "192.168.0.0/16"
We need to set up calicoctl also, which I do as a kubectl plugin.
Download and make calicoctl executable:
curl -L https://github.com/projectcalico/calico/releases/download/v3.27.3/calicoctl-linux-amd64 -o kubectl-calico
chmod +x kubectl-calico
Find a suitable directory in your PATH:
echo $PATHThis command will output something like /usr/local/bin:/usr/bin:/bin:/usr/sbin:/sbin. These are the directories (separated by colons) where your system looks for executable files.
Move kubectl-calico to a directory in your PATH:
For most users, /usr/local/bin is a common directory for user-installed software and is typically in your PATH. To move kubectl-calico there, use:
sudo mv kubectl-calico /usr/local/binLet's make sure it works, run:
kubectl calico version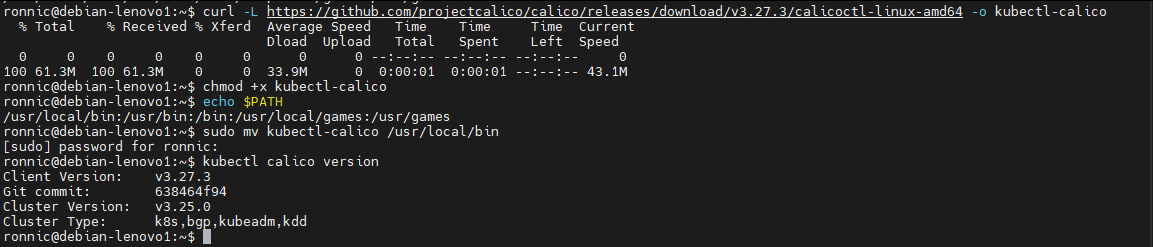
Now, let's set up the worker nodes. Make sure to disable swap.
Run the following for Master and Worker:
sudo systemctl status *swap
sudo systemctl mask  "dev-<>.swap"
Follow the same instructions for installing kubeadm, kubectl, and kubelet. Also, allow the worker ports in ufw for each node.
If you need to create another token and join command, use the following on the master node:
sudo kubeadm token create --print-join-commandFor each worker we load Debian on the new machine, configure the static ip, configure the firewall, install docker and containerd, then install the kube tools. Then, run the join command.
As you are running these join commands, check back on your master node to see if the additional workers are ready.

There you have it, once you join the other nodes, you are ready to use your new cluster!
Want to automate this with Ansible? I have it covered.
 ronnic1
Thanks for reading.